|
|
|
Photojournalists,
event, and studio photographers rely heavily on
flash for primary and fill-in lighting, so
they're especially affected by the problem. LCD
screens (laptops & desktop LCD monitors)
show the problem more than conventional CRT
monitors ... combine flash pictures with an LCD
screen and the problem is magnified. Most pros
like to show proofs & samples to their
clients on a computer monitor (part of the
beauty of digital), many depend on a laptop
computer as their primary display platform. And
it's a serious problem when unnaturally
strong or mottled looking skin tones in
screen-viewed pictures turn out to be a
deal-killer instead of a deal-sealer. Or not ...
? Other
photographers find little or no problem at all,
perhaps because of their particular shooting
styles or techniques. It may be that they rarely
rely on flash to light up their pictures.
(Available light pictures seldom show a
problem.) And perhaps they're viewing their
pictures on bright, sharp, clear CRT
monitors. Examples
& solutions (Below) An
example of too-vivid D2H flash photo skin tones,
courtesy of How
to fix the
problem *Software
required: Nikon
Capture 4 or
greater Strong
skin tones can be
easily corrected by
loading a modified
Chroma curve into
Nikon Capture 4's LCH
Editor. The modified
correction
curve is a
focused, slight
saturation reduction
to a particular range
of orange/red/pink
tones coupled with a
small lift to the
balance of the
saturation level.
I've gotten some
great feedback from
several different
pros who've tried it
on problem D2H skin
tones. Tip:
Open a people picture
(any race or skin
color) in Capture 4.
Now move your mouse
cursor over the
picture's skin tones
with the LCH Editor's
Chroma screen open.
And watch where the
colors map out on the
Chroma screen's
horizontal track
line. This will show
you where virtually
all skin tones
reside, (black,
brown, tan, yellow,
red, and white
skinned people), a
surprisingly narrow
area towards the left
side of the Chroma
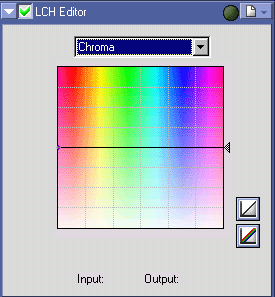
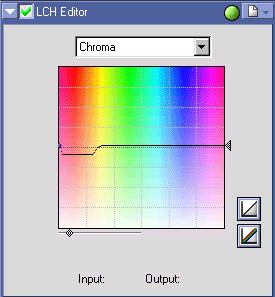
screen. Screenshots
of unmodified and
modified Chroma
curves are shown
below, followed by
samples of the above
picture after
applying increasing
levels of Chroma
curve
corrections. The
unmodified
(default)
Chroma curve
produces
equal
saturation
throughout
the color
spectrum. The
modified
Chroma curve
slightly
desaturates
the
offensive
colors and
very
slightly
raises the
saturation
level in the
remaining
colors to
retain image
quality. For
extreme
cases, click
and drag the
arrow on the
right side
of the
Chroma
screen
downward
until the
skin tones
desaturate
enough to
suit your
needs. By
dragging the
arrow down,
the curve's
shape &
output
balance are
retained.
(Samples
with
stronger
curve output
also shown
below.) (Below)
Harsh tones slightly
corrected to a more
natural look with my
-10+2 correction
curve (the one shown
in the above
screenshot). This is
an extreme skin tone
example, so this
version is followed
by two more views of
the same picture with
stronger curves.
(Below)
with a stronger -15-3
curve. (Below)
And with an even
stronger -20-8
curve Another
example (Below)
Another example of
too-strong D2H flash
photo skin tones,
also courtesy of pro
photographer
Israel
Hadari.
Mr. Hadari especially
noted the man's "red
face". Also note that
the woman's skin has
excessively strong
yellow and orange
overtones. (Below)
Skin tones corrected
to a more natural
look with a simple
"click" in the LCH
Editor in Nikon
Capture 4 software
using the -10+2
Chroma
curve. Download
the modified Chroma
Curves
(free) Put
the file(s) in the
default folder that
comes up when you
select "Load" in the
Capture 4's LCH
Folder icon to the
right of the green
light. (It's usually
"My Documents".)
Click & open the
file and be sure the
green check mark is
on next to the LCH
Editor title. Choose
the Chroma view
option in the
dropdown choices. The
shape of the curve
line should look
exactly as shown
above, the up/down
positioning relative
to the midpoint will
vary depending on the
strength. Toggle the
check mark on &
off to view the
differences. Flexibility
Capture
4's LCH Editor works
on any file format:
Jpeg, NEF, or Tiff.
You can batch process
your pictures in
Capture 4 with it and
make your workflow
simple. And the same
Chroma correction
also works to fix
oversaturated skin
tones in Nikon D1,
D1H, D1X, D100, D70,
and Coolpix pictures.
In fact, it will work
on any Jpeg, or Tiff
file from any
camera. Printing
In
my experience,
regardless of how
intense some
uncorrected pictures
might look on screen,
they'll probably look
great in print
without any
correction - bold,
bright, and
colorful. Hope
for the
future Perhaps
Nikon's upcoming D2H
firmware upgrade will
make this page
obsolete. Let's hope
so ... |

 Some
photographers have problems with the D2H's skin
tones, which can show strong, sometimes almost
mottled-looking orange, yellow, red, and pink
overtones. Flash pictures usually intensify the
effect.
 Original.jpg)


LCH-10+2.jpg)
LCH-15-3.jpg)
LCH-20-8.jpg)
Original.jpg)
LCH2.jpg)