|
|
|
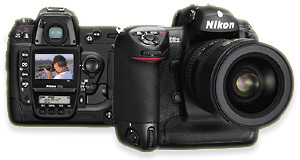
Nikon
D2X On
the Run
...
Black
Angus roundup at a big Texas
cattle auction. I reached
under the gate with my Nikon
D2X & held it close to the
ground while I blindly pointed
it towards the cattle &
snapped away with the camera
set on continuous high speed
mode (5
fps).
Click
for a 1200x 797 pixel view
(572 KB). The
longer I thought
about it, the only
real question was
"If not now,
when?" Soon
after the D2X became available, a
friend of mine & I were
discussing whether or not we should
move up to the D2X from our current
cameras. Most of
our talk revolved around the D2X's new
CMOS image sensor and its 12.2 million
pixel output resolution. At that time I
owned a Nikon D2H, nearly identical to
the D2X in most respects except for the
image sensor & output resolution.
Yes, there were other nice enhancements
to the D2X - it had a better LCD
screen, a wider-opening (easier access)
memory card door, three new features
(image overlay, multiple exposure,
high-speed crop), some tweaks here and
there, but the big difference was the
D2X's new high resolution sensor. It
certainly looked tempting, but I told
him I thought it was "just too
expensive". I'd recently commented
to him that I couldn't see myself
spending more than $1,999 on a camera
again. Cameras like the Nikon D100,
Canon 20D, Olympus E1, Nikon D70, and
the pre-D2Hs Nikon D2H (with its big
price drop) showed me that it didn't
necessarily require big bucks to buy a
high quality digital SLR. My
friend paused for a moment.
"C'mon, John", he said. "Think about
it ... If not now, when?"
He was
right, it appeared that the D2X was too
strong to ignore. But was it worth
going over my self-imposed price limit?
This was going to take some serious
thought ... it was time to weigh the
pros & cons and make a
decision. Pros
& Cons The
D2X sensor's tiny pixels have a
pitch (physical size) of just 5.5
microns (1 micron = 1/1000 of a
millimeter). That comes out to about
180 pixels per millimeter, which
translates into 90 line pairs per
millimeter of resolving power. Line
pairs per millimeter (Lp/mm) are the
optics industry's standard
measurement for defining the
resolving potential of camera
lenses, film, digital sensors,
microscopes, binoculars, & the
like. Line
pairs consist of groups of
alternating black & white
lines, the
black-white-black-white
pattern makes the individual
lines absolutely distinct. The
thinner the lines, the more
line pairs there are per
millimeter. The number of line
pairs per millimeter that can
be distinctly resolved is what
defines the ability of a
device to capture or record
fine details. A
sensor that can resolve more
Lp/mm can record finer details
than a sensor that resolves
fewer Lp/mm. The same goes for
lenses, a lens that resolves
more Lp/mm can capture finer
details than a lens that
resolves fewer
Lp/mm. It
has been calculated that most
(including the most expensive)
lenses in real-world shooting
conditions actually resolve details
in the 50-80 Lp/mm range. Some
specialty lenses can do better
(certain prime & macro lenses in
certain conditions), cheap lenses
usually do worse. What
this all means in a practical sense
is that with 90 Lp/mm of optical
resolving power, the D2X's sensor
has the capability to resolve fine
image details better than most
cameras and most lenses under most
shooting conditions. Click
on the Google Search button below to
learn more about the relationships
between line pairs, lenses, cameras,
and sensors. A
CMOS sensor uses less electric power
than a CCD sensor. This has a couple
of major benefits. First, longer
battery life. Second, less static
buildup, which means less dirt &
dust attracted to the sensor's cover
glass surface. Many experienced D2X
users report that they seldom or
never need to clean their camera's
sensor. Studies
have shown that at even at a closeup
viewing distance of just 12 inches,
the human eye struggles to discern
details in a printed picture finer
than about 150 line pairs per inch.
Details in excess of 150 lp/pi tend
to blur or blend together.
150
line pairs per inch of visual print
acuity translates into 300 pixels
per inch (ppi) of printer output
resolution. Not coincidentally, 300
ppi is generally considered to be
the ideal output setting for high
quality prints. Most fine quality
glossy magazines typically print
photographs at 300 ppi. At
300 ppi print resolution, the D2X
produces 14.3 x 9.5 inch prints
without resizing or interpolation.
Larger prints interpolate and retain
their quality elegantly. And smaller
prints smack with detail. Large
or small, if fine quality prints are
important, this is the camera to
have. I
prefer to shoot combined strictly
Raw or Raw + Jpeg in my cameras.
Simple math showed me that if I took
a 19.5 megabyte uncompressed D2X Raw
file and added a 7 to 8 megabyte
Jpeg large / fine companion file, I
was looking at only getting about 36
pictures on a 1 gig memory card.
That meant frequent card changes, a
lot of memory cards, and a lot of
sitting time at my computer
uploading images card by card after
a typical day of
shooting. And
then there was the concern about
limited hard drive space and
possibly too-slow image processing
speeds on my 1 Ghz Pentium III
computer equipped with a gig & a
half of ram. Plus the problem of
archiving those big files with my CD
burner, 700 megabytes (or less) at a
time. That would only be 25 Raw +
Jpeg picture sets on a CD. That
meant even more sitting time
at my computer. Would
I need to upgrade all my gear to be
able to shoot Raw files? Multi-gig
memory cards, a new motherboard with
the fastest processor available,
more ram and a double layer DVD
burner for archiving? I could see
how that might stretch the true cost
of owning the camera twofold or
more. I
was concerned that I might have to
shoot strictly Jpegs unless I did a
computer upgrade. That didn't sound
too bad, I'd read many reports that
the D2X's straight Jpegs
(Large/Fine) were excellent. Most of
those reports came from people who
(like me) preferred to shoot Raw +
Jpeg or Raw only, but didn't want to
deal with the big 19.5 megabyte Raw
files. They were shooting Large/Fine
Jpegs (around 7 to 8 megabytes) and
seemed to be pleased with the
results. I rationalized that if I
needed to, I might be satisfied with
shooting just Jpegs, too.
But
I dreaded the thought of dealing
with exposure or white balance
issues if I limited my shooting to
Jpegs ... Raw will definitely spoil
you in those areas. So I decided to
use Compressed Raw + Jpeg and try to
work through my equipment
limitations. It
turned out that Compressed
Raw files (~11 megabytes) work
great. In actual use the D2X's
Compressed Raw files open in Nikon
Capture reasonably fast and transfer
from Capture to Adobe Photoshop with
little delay. That made shooting Raw
fun again. By shooting Compressed
Raw + Jpeg small combos, I get about
85 picture sets (Raw + Jpeg) on a
one gig card & about 170 on a
two gig card. Look
at these diagrams and
you'll see that the same
amount of movement more
than doubles the amount
of pixels that are
influenced by camera
shake when comparing the
D2X to a typical six
megapixel
camera. To
overcome the problem, some D2X
shooters double the traditional
shutter speed rule of thumb (a
minimum of 1/ lens focal length
shutter speed). In other words, if
you're shooting at a 200mm focal
length and the old rule of thumb
equaled 1/200th of a second, do
what's necessary to double the
shutter speed to 1/400th in order to
overcome the greater camera shake
& motion blur sensitivity of the
D2X's smaller pixels. You can easily
control this by observing the
shutter speed in your viewfinder and
making the necessary adjustments to
Vari-Program, Aperture or ISO
settings to increase shutter speeds,
or by shooting Shutter Priority and
presetting the shutter speed in
accordance with your focal
length. At
the very least, shoot smart, not
sloppy. Pay attention to the
shooting data in your viewfinder, be
aware of your shutter speeds. Hold a
steady hand, brace your camera when
you can. (You should be doing these
things anyway.) The
smaller the pixels, the more
critical aperture settings become.
Contrary
to popular belief, smaller lens
apertures (with their greater depth
of field) don't necessarily result
in sharper pictures. When the
negative effects of aperture
diffraction begin to outweigh the
positive effects of increased depth
of field, sharpness falls off and
fuzziness sets in. Smaller apertures
also cause slower shutter speeds,
often requiring higher ISO settings
to make a shot. Understanding
how aperture diffraction works and
relating how diffraction applies to
the small pixels of the D2X will
help you to take sharper pictures.
Click
here for the full
article.
(It applies to other cameras as
well.) The
D2X is big and heavy. With its
built-in vertical grip and rugged
construction, the D2X is bulky,
conspicuous, and a burden to carry.
I prefer the smaller size &
lightweight qualities of cameras
like the Fuji S1 & S2 Pro, the
Canon D5, 10D & 20D, and the
Nikon D50, D70 & D100 without a
vertical grip. I
wish Nikon offered a version of the
D2X without a vertical grip. I'll
bet it would outsell the current
dual grip version. They could have
called it the D2X, and the
D2X with a vertical grip could be
called the D2Xv (?). What the
heck, most people I know seldom or
never use the vertical grip &
controls anyway. In fact, a lot of
people (myself included) lock out
the vertical shutter release button
to prevent accidental autofocus
activation. Well
... I
decided that the D2X was a
keeper. The high Lp/mm
resolution of the D2X's sensor
is what really sold me. It's
nice to know that my camera
can outperform my lenses. As
far as support gear is
concerned, I'll make the
camera work for me with the
equipment I have on hand. I
figure that if I really need
to, I'll buy some bigger
memory cards & upgrade my
computer later.
And
I'll just deal with the size
& weight. The features
& image quality are worth
it. The D2X has the best color
reproduction and takes the
sharpest full resolution
pictures of any camera I've
ever used.
My
preferred camera
settings Image
Quality Raw
(NEF) plus small (S) sized
normal quality jpegs.
The
NEF files are digital
'negatives', critical
corrections and adjustments to
white balance, exposure,
sharpening, tone, color space,
and much more can easily be
done after the fact on your
computer using compatible Raw
software such as Adobe
Photoshop, Nikon Capture 4,
and others. I use the Small /
Normal quality Jpegs for image
previews & slide
shows. On.
Compressed Raw has no visual
loss of image quality with
about 60% of the file
size. White
Balance Auto. Sensitivity Preset
to ISO 200 as my default
setting. I like the inherently
faster shutter speeds that ISO
200 produces for everyday
photography. Auto
ISO Off
unless shooting Shutter
Priority. Auto ISO will not
work effectively in Programmed
Auto Exposure or Aperture
Priority shooting. It is
excellent if shooting in
Shutter Priority
mode. Here's
how Auto ISO works: Note:
Auto ISO does not work in High
1 (ISO 1600) or High 2 (ISO
3200) settings. Image
Sharpening In-camera
set on Medium High. This gives
me the most accurate LCD
preview of what a well
processed finished image will
be. And the in-camera Jpegs
look excellent with this
sharpening setting while I
view them on my
computer. I
find that near-ideal image
sharpeness is attained by
processing a Raw image in
Nikon Capture. Reset
sharpening to None in Advanced
Raw and applying Capture's
Unsharp Mask at 50, 5, 4.
If
additional sharpening is
necessary, try adding Unsharp
Mask set at 100, 0.3, 6 in
Adobe Photoshop. Tone
Compensation Low.
Low tone produces the maximum
highlight & shadow
details. Add contrast as you
like after the fact in Nikon
Capture or Adobe
Photoshop. Color
Space Mode
I (sRGB). I believe that sRGB
Mode 1 produces the most
realistic colors. Hue 0
(default) Exposure
Compensation None.
Custom
Setting a4 Focus
Tracking with Lock "Off". Set
to "off", the camera will
react to focus changes more
responsively. Custom
Setting d4 File
Number Sequence "On". Acts as
an odometer for the total
number of pictures you've
taken with your camera and
prevents the possibility of
overwriting an existing
picture in your computer files
that might have the same file
number. Custom
Setting e1 Flash
Synch Speed 1/250 (FP auto).
This setting will enable a
Nikon SB-800AF Speedlight to
synch all the way up to the
D2H's maximum 1/8000 shutter
speed. Custom
Setting f5 Once
you're inside Custom Setting f
5, go to "Menus &
Playback" and choose "On".
This enables menu selections
and image playback to the
Command and Sub Command dials
in addition to the
Multi-Selector rocker switch.
Using the Command & Sub
Command dials is especially
fast & easy while
scrolling through the pictures
you've taken. Now you can just
roll the main Command Dial to
scroll through the pictures,
and roll the Sub Command Dial
to view the histogram,
highlights, & shooting
data.
|

.jpg)
.jpg)