Best
viewed at 1024 x 768 or greater screen resolution,
16 bit color or better. All content &
photographs copyrighted, all rights
reserved.

Raw
Conversion & Advanced Photoshop users:
See
special information in the bottom section of this
page.
LBHR Action download & installation instructions
Click Here > Download the free Lonestar Jpeg Lab Sharpening LBHR Action
Choose "Save" from the options when the File Download screen pops up and remember where you park it on your computer. It will only take a few seconds to download. When the Download Complete message pops up, click on "Close".
Mac users
might need to download it as a zip file
>
Click
here to download the LBHR Action zip
file
![]()
If you are unable to download the action or the zip file, e-mail me (go to the About / Contact page and you'll find my e-mail address). I'll be happy to directly e-mail you the zip file or the unzipped action.
How to load the Action into Photoshop
|
Requires Adobe Photoshop 5, 6, 7, CS, or CS2. (Windows or Mac) |
|
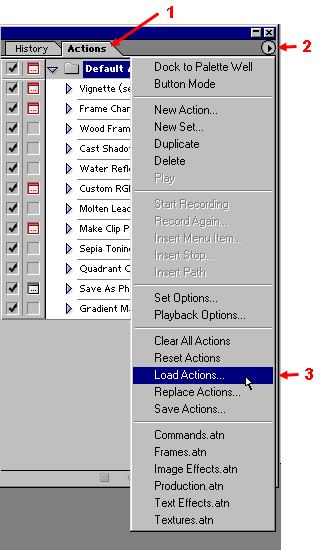
Click on the
Actions Tab in Adobe Photoshop. |
|
|
|
- (Below) Your computer will pop up a file locator screen.
- Navigate to where you
parked the downloaded the Action file,
click & highlight the Action and then click on the Load button. - The Action will automatically load itself into Photoshop's Default Actions.

When you're ready to run the
Action on a picture in Photoshop, open the
picture and simply hit the F12 key in the top row of your
keyboard. The
Action will run automatically.
Note:
Always view your pictures at 100% size (also called "actual
pixels"
or "original size") for the best analysis of sharpening
quality. Smaller
view sizes are fine for color and composition analysis, but
they do
not accurately display true sharpening.
As I mentioned in
the main article, (as opposed to most traditional
sharpening procedures)
the LBHR Sharpening Action should be run
first, not last.
Finishing
touches (white balance, brightness & shadows,
color tweaking, exposure, contrast, additional
minor or spot sharpening, etc.) should be done
afterwards if & as necessary.
Special information for Raw conversion & Advanced Photoshop users
- For Raw conversion
users

Be sure your in-camera sharpening is set (or reset) equivalent to "Normal" in your Raw conversion software before you transfer or open the image in Adobe Photoshop.
*Nikon Capture software shown
- For Advanced
Photoshop users

You can have the Action pause at the primary Unsharp Mask step* of the process for you to change the sharpening settings by clicking the dialog on/off box next to the Unsharp Mask.
If you do this, the Unsharp Mask box will pop up as shown in the screenshot below.
*Do not change the secondary Unsharp Mask settings (the one below "Flatten Image")

Notice that sharpening in the Lab Lightness Channel is displayed in black & white
For not-so-sharp pictures, increasing the Amount to 350% and the Threshold level to 6 works nicely.
A smaller Radius (0.2 to 0.4 pixels) is better for images that have been downsized for web page display . If you go down to 0.2 pixels, you can crank the Amount up a lot.
In all cases, remember that because of the effect of LBHR, the preview should look slightly oversharpened at this point.
Your feedback is appreciated! My e-mail address is located in the About / Contact page.